
Refinish a Wood Deck , See how we cleaned, pressure washed and painted a multi-level deck to give it a fresh look and to maintain it so it will last for years to come.
Select a Cleaning Solution
Diluted bleach is a popular choice for deck cleaning, but isn’t necessarily the best choice. Over time, stain is more likely to fade or discolor and bleach can hasten the degradation of the wood. Instead, select a cleaner .
formulated specifically for deck and follow manufacturer instructions regarding dilution and application.
Apply Cleaner
Deck cleaner can be spread by using a brush or broom to sweep it across the surface or applied using tank sprayers , as shown here. Make sure all edges, corners and gaps are treated as well as the deck surface. Follow manufacturer instructions regarding the use, but in most cases, the solution should be left to soak on the wood
ford a period of time before continuing. ABOUT
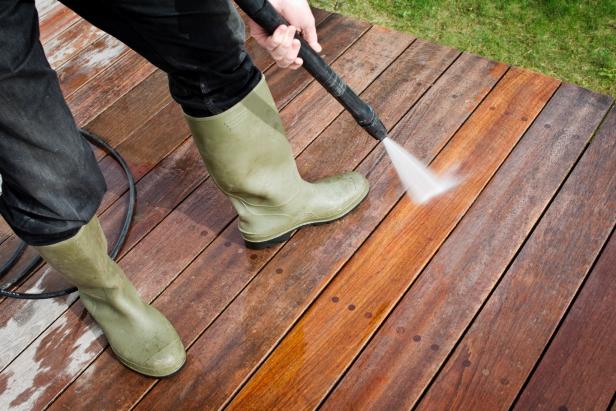
Pressure Washing
A pressure washer is a powerful tool for cleaning a deck. Take care to select a nozzle appropriate for the job. Spray nozzles are categorized by the angle of the spray. A zero-degree “red tip” provides the most powerful stream but can damage softwood. Consider a nozzle with a spray angle of 25 or even 40 degrees to clean your deck without scarring the surface. westchesterpainters.net
Perfect — using a solid stain on the entire house is a great choice for long-lasting color and protection, especially on wood siding, decks, and fences. Here’s a full step-by-step guide so your job comes out clean, even, and professional-grade 👇
🧰 TOOLS & MATERIALS
- Power washer (1300–2500 PSI)
- Scrub brushes & extension pole
- Exterior cleaner or bleach solution (1 part bleach to 3 parts water)
- Painter’s tape & drop cloths
- Sandpaper or sander (60–80 grit for rough areas)
- Caulk, putty, wood filler (for repairs)
- Solid stain (oil- or acrylic-based)
- Paint sprayer, roller (¾” nap), or brush
🧼 STEP 1: PREP THE SURFACE
- Power Wash Entire House
- Use a 25° or 40° nozzle.
- Start from bottom to top with cleaner, then rinse top to bottom.
- Pressure: 1300–1600 PSI for wood, up to 2000 PSI for harder siding.
- Remove all dirt, mold, and loose paint/stain.
- Let dry at least 48 hours before staining.
- Repair & Sand
- Replace rotted or damaged wood.
- Lightly sand to remove rough spots, splinters, or peeling paint.
- Spot-sand shiny or glossy areas so stain adheres evenly.
- Mask & Protect
- Cover windows, trim, light fixtures, plants, and concrete with plastic or paper.
🎨 STEP 2: APPLY THE SOLID STAIN
- Stir Thoroughly
- Mix the stain well before and during application to keep color consistent.
- Application Tools
- Spray and back-brush for the smoothest, most even finish.
- You can also use a roller and brush if you don’t spray.
- Technique
- Work from top down (gables → walls → trim → bottom).
- Apply with the grain of the wood.
- Maintain a wet edge to avoid lap marks.
- Two coats are recommended for best durability and uniform color.
- Drying Time
- Allow 4–6 hours between coats (check manufacturer’s label).
- Don’t stain in direct sunlight or when rain is expected within 24 hours.
🏠 STEP 3: FINISH TRIM, DECK, PORCH & FENCE
You can use the same solid stain color or coordinate:
- Trim: lighter or darker shade for contrast.
- Deck/Porch: same product, but ensure it’s rated for horizontal surfaces.
- Fence: apply with sprayer or roller, one or two coats depending on coverage.
🌦️ FINAL TIPS
- Ideal temperature: 50°F–85°F (10°C–29°C).
- Humidity under 70% for best drying.
- Clean tools with soap and water (for acrylic stains) or mineral spirits (for oil-based).
- Maintain by washing once a year; recoat every 5–7 years as needed.