
HOW TO FIX A HOLE IN THE WALL
From damage due to moving mishaps or wayward doorknobs, a hole in your wall is a fairly common problem. The good news is that it isn’t that hard to repair. Sheetrock Drywall
How to Fix a Large Hole in the Wall
If you find yourself with a large hole in your drywall, you don’t have to call a handyman: Patch up the hole yourself by following the simple steps below. Repair Tape Plaster Skim Coats. TESTIMONIALS
Cut your Reshaped Hole
- Measure the shape you’ve drawn around the hole in the wall and cut the same size patch out of your new piece of drywall.
- Hold the new patch over the hole and trace the edges with a pencil.
- Cut along the pencil lines with a knife/drywall saw to match the patch. Your hole should now be a square or rectangle shape.
Install the Backing Strips
- Cut pieces of lumber or plywood (you can also use paint stirring sticks) to be a few inches longer than the long sides of the hole.
- Put one of the strips into the hole along one of the long sides so it is centered over the drywall edge (half behind the drywall, half exposed).
- Use a drill and screws to secure the strip. SHEETROCK DRYWALL TAPE REPAIR PLASTER Drive the screws through the drywall and into the strip. Keep the screws about 1 inch from the drywall edge, making sure to counter sink the screws so the hole can be filled with spackling compound (USG mud). Repeat the same process to install the other backing strip at the other long side of the hole. www.manuelzpaintinghomeimprovementinc
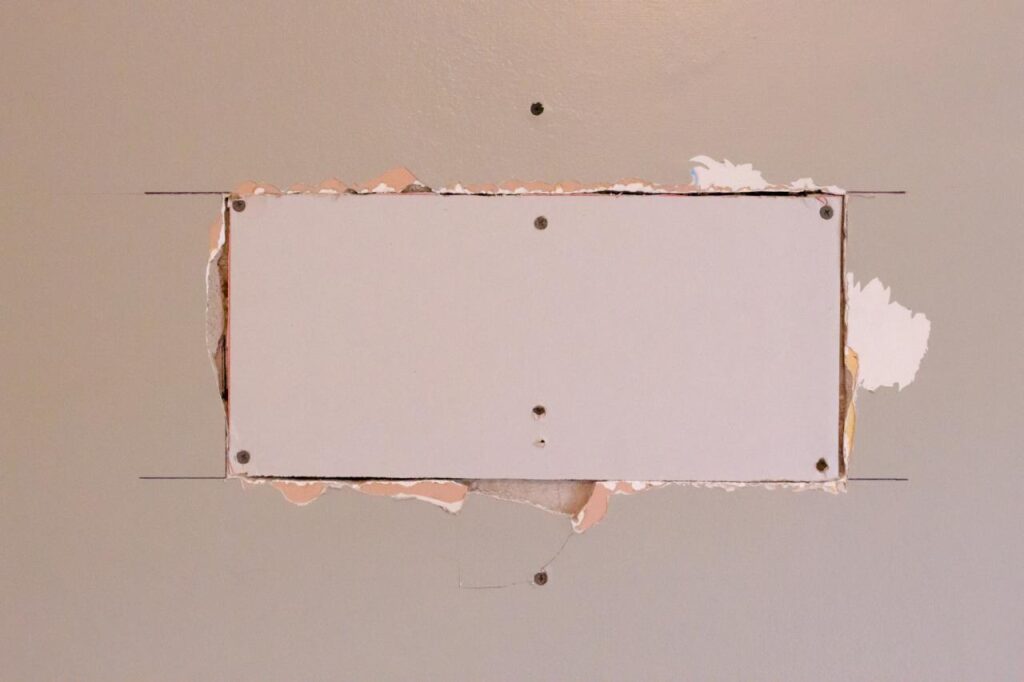
Install the Drywall Patch
- Place the new patch of drywall you cut into the hole; the gap between the edges of the hole and the new drywall patch should have minimal gap space.
- Place the new drywall patch over the hole and use a drill and drywall screws to gently secure it to the backing strips.
- Keep the screws about 1 inch from the edges of the patch, making sure not to overtighten the screws and break through the paper face of the drywall.
Painting Walls & Ceiling – Professional Method
1. Prep Work (Most Important)
- Move or cover furniture
- Protect floors with drop cloths
- Remove outlet & switch covers
- Patch nail holes, cracks, dents
- Sand smooth (walls & ceiling)
- Remove dust (vacuum or damp wipe)
2. Repair & Surface Prep
- Fix drywall cracks and nail pops
- Skim coat uneven areas if needed
- Caulk trim, corners, and gaps
- Spot-prime all repairs
3. Priming
- Use PVA primer on new drywall
- Stain-blocking primer for water marks
- Prime dark colors before repainting light
Painting the Ceiling
- Paint ceiling first
- Use flat ceiling paint (reduces glare)
- Cut in edges with brush
- Roll in one direction, keep wet edge
- Two coats for uniform finish
Painting the Walls
- Cut in corners, ceiling line, trim
- Roll in “W” or vertical pattern
- Maintain wet edge
- Apply 2 coats for full coverage
Professional Tips
- Use quality rollers (⅜”–½” nap)
- Light sanding between coats
- Proper lighting reveals flaws
- Let paint dry fully before second coat
Finish & Cleanup
- Remove tape while paint is slightly wet
- Reinstall outlet covers
- Final touch-ups
- Clean, neat job site
Customer-Friendly Line (for your business)
We properly prep, repair, prime, and apply two clean coats to walls and ceilings for a smooth, professional finish.
If you want, I can:
- Rewrite this for your company marketing
- Make a short estimate description
- Create a before-painting checklist
- Adjust wording to sound more high-end & professional